First ever Kotobukiya Plamo kit ... and I didnt go well ^^;; ......
Yeap.. I jumped the wagon and build her!
Its been a while since last post ^^;;.. and yet again delayed post >_< ... haha.. bought this plamo while ago. My first koto kits, instead buying mecha like Zoids, Armored Core, or Frames Arm... I bought Saber-san.. simply coz its Saber ... LOL..
anyways.. this kit is really cute.. I mean.. look at her.. lol.. lets go around on the runners..
What is a model kit/plamo if it didnt comes with a manual?
The A plate is a silver molded for hands, arm armor, and chest parts...
B plate got 2 identical which is for side skirt armor, leg and feet.
C also got 2 identical for arm parts.. theres 2 item that cutted off from the runner.. I wonder what it is
The D plate is for pants, and inner skirt parts..
E, F, G and H are just tiny plates which E and F is for waist part, G is for arms, and H is for neck...
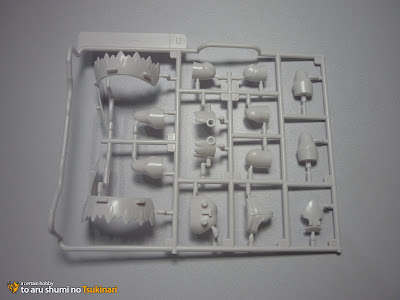
I plate is all for the hair ^^ quite yellow the color
the K plate is for the Excalibur sword.. kinda neat that they give the transparent one and the like always kotobukiya like to paints their kit for consumer :D.. very nice!
This is the first time that I got from a model kit.. runnerless parts complete with pre-painted :D, awesome!
shoulder parts, Excalibur sheath and skirt
The face and expression part.. again.. pre-painted XD
They also provide water slide decal for those who like to paints! :D
and Finally the PC runner.. it only got 10 pieces.. mostly for feet, side armor, and more i forgot lol
This paper is for ordering runners and parts incase u messed up.. which I did.. unfortunately.. read more below lol
The manual.. theres a few pages that got full color page.. except the assembling manual which as usual B/W..
The build is started with the leg first.. its kinda straight forward.. the knee joint didnt use any polycaps..
The feet.. theres polycap there inside the front feet part.. that u connect with he back part's peg..
A little look after done the leg.. its pretty nice.. the joint is pretty stiff and the articulated feet is a plus :D
Went zombie a lil bit and complete the lower half body :D.. please note that the side armor is pretty loose.. the ball polycap didnt stick well into the whole on the side skirt.. I dunno why they use ball polycap <_<... after moving around the side armor.. it pop off.. ^^;;...
Also note that.. the back of the waist, some parts are hard to put together.. must be carefull so did not break the parts.. I dont have pic of that.. will update it soon..
and my zombie mode stop after this happened... orz..
The peg is too thin I guess.. when I try to put the parts together, its kinda thight and tried to put a lil force on it.. then snap.. ^^;; tried to be carefull tho.. gonna fix this up!
Also I did this quick image for Hobbylink Japan's Gunpla TV 'I love Gunpla TV' contest :D
Oh yeah.. GN-XIII got a lil delay... coz all the images I took and edited in the pc is gone due HDD died.. so I had to redo all over again.. it will takes time.. some of the pic I need to retake coz I cut when transfer the image from the camera >_<;;
anyway thats all for now...
Ja!


9 comments :
Ohhh... Started. Good, good. =)
Wait... You "tried" to FORCE the part in and it...
Bad news, this is Kotobukiya, parts are fragile, do use EXTREME caution in assembling them.
Thanks..
Well.. it just stuck in the hole there.. It suppose to go all the way but its got till halfway.. I guess I didnt use EXTREME caution enuf then ^^;;
"Oh yes, it going nicely... and OH MAI GAWD! IT BROKE! T_T"
And there ends the fun part.
Did ya manage to fix it?
wheeeewwwww.... Realy gonna do some work on that peg... drill'em nice and good... Hey how do you get into GunplaTV contest?
still find a way.. I tried to you my 0.8 mm brass rod.. but its too thin.. the peg is about 1mm gotta try something else ^^;;
lol..
FB-ed :P
sucks when that happens...koto being koto
yeah... more worse... its my first koto kit.. this is bad start >_<
Koto gave me a bit of snapfit and seamline problems as well
Good luck on fixing the peg.
Post a Comment